SherAlgo Installation and Usage Manual (Step-by-Step)
Built for beginners and updated for the newer compact panel. Follow this in order: install, activate, understand the collapsed layout, run one small demo session, then expand sections only as needed.
Start from the compact panel and open only the section you need.
Set small values, place one planned trade, then manage risk before trying advanced tools.
Use the live totals at the top to confirm exposure before any mass action.
Before You Start
- 1. Install MetaTrader 5 on Windows and log into your broker account.
- 2. Confirm you can place manual trades on that account (market open, permissions OK).
- 3. Keep a demo account ready. Do not start on live account first.
- 4. Prepare your license key text exactly as received.
- 5. Decide one symbol for testing (example: XAUUSD or BTCUSD).
- 6. Expect the panel to open in a compact state. That is normal in the newer UI.
Installation (Noob Safe)
- In MT5, click File > Open Data Folder.
- Open folder path: MQL5 > Experts.
- Copy the SherAlgo file into this folder.
- If file is .mq5: open MetaEditor, compile, and ensure 0 errors.
- Return to MT5 and restart platform (or refresh Navigator).
- Open Navigator (Ctrl+N) and find SherAlgo under Expert Advisors.
- Drag EA to your chart.
- In popup, enable Allow Algo Trading and Allow live trading.
- Press OK.
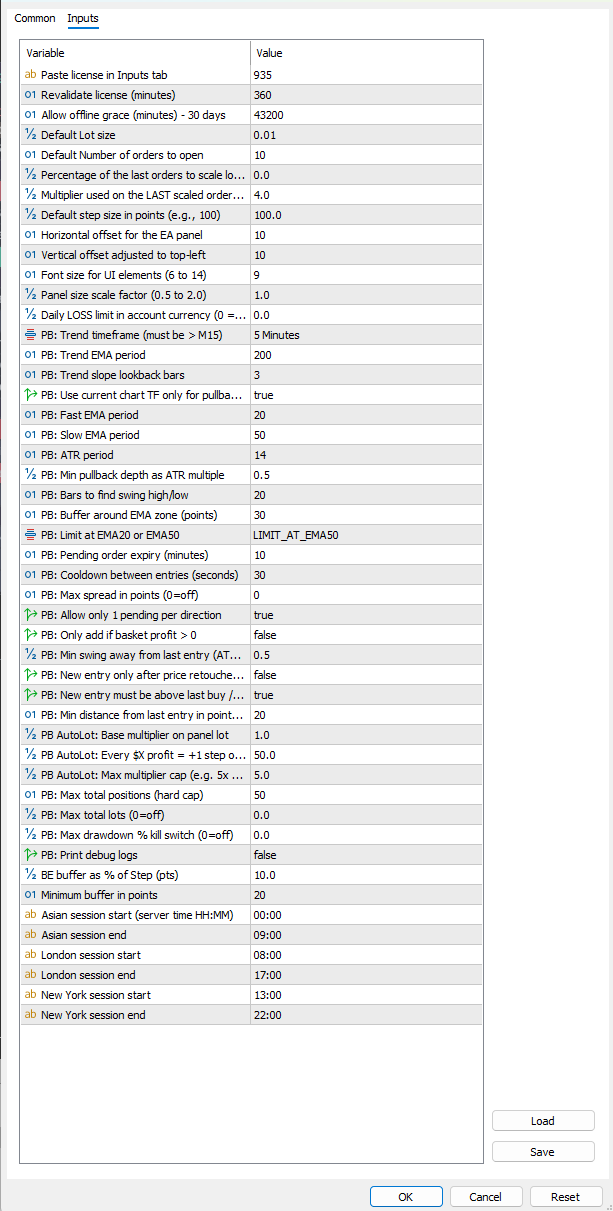
PanelScaleFactor in Inputs.Activation (Exact Clicks)
- Right-click chart > Expert Advisors > Properties.
- Go to Inputs tab.
- Find
LicenseKeyand paste your key. - Click OK.
- Now set WebRequest: Tools > Options > Expert Advisors.
- Enable: Allow WebRequest for listed URL.
- Add:
https://83.147.39.49. - Click OK.
- Remove EA from chart and attach again once.
- Check Experts tab for active license message.
Panel States and Layout
The updated UI is designed to stay slimmer on chart. You will usually see a top summary strip first, with the larger control groups collapsed until you open them.
- Collapsed state: best for monitoring. Keep sections folded when you only need totals and account status.
- Expanded state: open one section at a time so the chart stays readable and you avoid clicking the wrong control.
- Top summary strip: this remains your quick check for opened lots, pending lots, floating P/L, equity, and balance.
- Recommended order: open TRADE to plan entries, then RISK & PARAMS to protect them, then MANAGE only when you need exits or cleanup.
First Use Session (Beginner Flow)
- Use a demo account.
- Keep the panel compact first, then expand only the TRADE section.
- Set small values such as Lot = 0.01, Qty = 2 or 3, and a conservative Step suitable for your symbol.
- Place one plan only: click either BUY or SELL once, not both.
- Watch the top summary strip update so you can confirm the new lots and floating result.
- Expand RISK & PARAMS, type a clear SL, and apply it.
- Type a clear TP and apply it if you want a basket target.
- If price moves in your favor, test Set BE once.
- Only after that, open MANAGE and test one close tool or one cancel tool.
- Leave advanced AUTO or PB controls untouched on your first session.
Important Inputs Explained
These are the inputs beginners must understand first:
- LicenseKey: your activation key.
- DefaultLotSize: base lot used by panel actions.
- NumberOfOrders: how many orders in ladder.
- DefaultStepSize: gap between ladder levels (points).
- DailyLossLimit: equity-based daily safety lock.
- Panel section/display inputs: use these if you need to improve readability for the compact and expanded panel states.
- PanelScaleFactor / FontSize / X/Y Offset: panel readability and position.
- BE_BufferPercentOfStep / BE_MinBufferPoints: Set BE safety buffer tuning.
Safe Usage Rules (Do This Always)
- Use demo first for at least 1 week before live account.
- Never click BUY and SELL randomly. Choose one plan per session.
- Keep unused sections collapsed so you can focus on the active task and avoid stray clicks.
- Always define SL before increasing lot or quantity.
- Set DailyLossLimit so one bad session cannot destroy account.
- If confused, use only: the top summary strip, Lot/Qty/Step, BUY or SELL, SL, TP, Set BE, and basic Close/Cancel buttons.
- Avoid PB/AUTO features until manual workflow is mastered.
Troubleshooting
- Panel looks missing: first check whether sections are simply collapsed; then confirm Algo Trading is ON, the EA is attached, and the chart has enough space.
- License failed: wrong key, WebRequest missing, no internet, or bad host format.
- Orders rejected: lot below minimum, no margin, market closed, invalid stops.
- Buttons do nothing: check Experts/Journal tabs for exact broker error message.
- Mixed positions issue: close one direction before Compound/AUTO actions.
Panel Screens (Match With Button Sections)
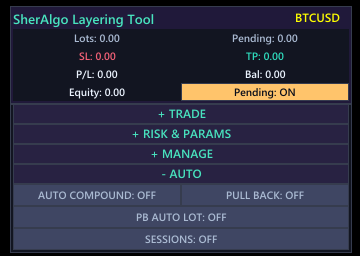
Collapsed Panel
Compact default state with the top summary strip visible and deeper controls folded away.
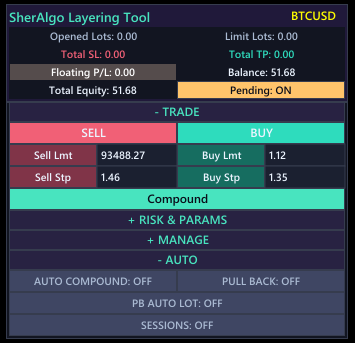
TRADE Section Expanded
Open this first for entry planning, order direction, and ladder actions.
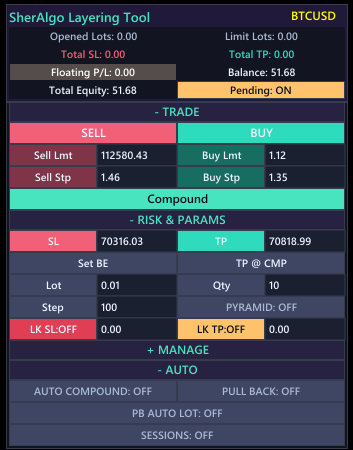
RISK & PARAMS Expanded
Use after entry for SL, TP, break-even, and core parameter checks.
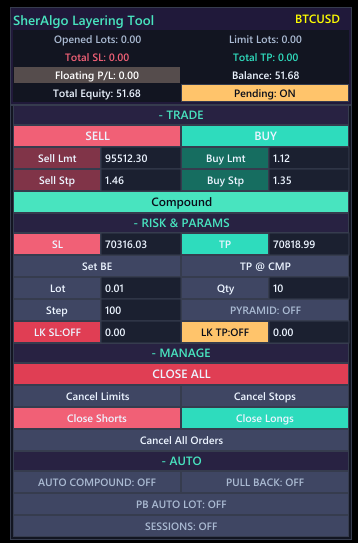
MANAGE Section Expanded
Open only when you need to close positions or cancel pending orders.